Views: 0 Author: Reviewed by Huipu Personal Care Product Engineer Publish Time: 2025-10-01 Origin: Site


To clean a hair brush, first remove loose hair with your fingers, a tail comb, or a wide-tooth comb. Then wash the bristles with warm water and a small amount of mild shampoo or liquid soap. Use an old toothbrush to scrub around the base of the bristles, where grey lint, scalp oil, dust, dandruff flakes, and styling product residue usually collect. Rinse carefully and dry the brush with the bristles facing down.
Plastic and metal non-electric brushes can usually be soaked briefly. Wooden brushes, cushioned brushes, natural-bristle brushes, and electric hot air brushes should not be fully submerged in water. For electric hair dryer brushes, always unplug the product first, let it cool, remove loose hair, and clean only the brush head or surface according to the product instructions.
Remove loose hair before washing the brush.
Grey lint is usually a mixture of dust, fabric lint, scalp oil, skin flakes, and styling product residue.
Use mild shampoo or liquid soap for regular cleaning. Avoid strong chemicals unless the product care label allows them.
Scrub around the bristle base with an old toothbrush because that is where buildup is most likely to remain.
Do not fully soak wooden, cushioned, natural-bristle, or electric hair brushes.
Dry the brush completely before storing it in a drawer, bag, salon station, or hotel amenity kit.
Replace the brush if the bristles are bent, the cushion is cracked, the handle is damaged, or odor remains after cleaning.
For salons, hotels, and private label buyers, easy-clean brush structure and clear care instructions can reduce user complaints.
A dirty hair brush usually contains more than loose hair. The grey fuzz around the base of the bristles is often a mix of dust, fabric lint, scalp oil, dead skin flakes, dry shampoo, hair spray, mousse, gel, or leave-in conditioner. Oil and styling products work like glue, making lint and dust stick to the bristle base.
That is why pulling out the hair is not enough. A proper cleaning process should do three things:
Remove loose and tangled hair.
Loosen lint, oil, and styling residue.
Clean the bristle base without damaging the brush structure.
From a product design point of view, the easiest brushes to clean usually have enough space between bristles, a smooth bristle base, water-resistant materials, and a structure that does not trap residue too deeply. This is especially important for salon tools, hotel amenities, retail beauty products, and private label hair care accessories.
Not every brush should be cleaned in the same way. Before washing, check what type of brush you have.
| Brush Type | Can It Be Soaked? | Cleaning Notes |
| Plastic hair brush | Usually yes, briefly | Good for warm soapy water and toothbrush scrubbing |
| Metal brush | Usually yes, briefly | Dry well to reduce water spots or corrosion risk |
| Wooden handle brush | No | Clean bristles only; avoid soaking the handle |
| Cushioned brush | No | Water can enter the cushion and slow drying |
| Natural-bristle brush | No | Use gentle cleaning and avoid harsh scrubbing |
| Hot air brush / hair dryer brush | No | Unplug, cool down, remove hair, wipe surface, clean removable parts only if allowed |
For electric styling tools, never place the handle, cord, plug, motor area, air inlet, or heating area under running water. If the brush head is removable, clean it separately only when the user manual allows it.
Cleaning your hairbrush doesn’t have to be complicated. You just need to follow a few simple steps to keep your brush fresh and your hair healthy. Here’s how to clean hairbrushes the right way, whether you use a premium hair brush for healthy hair or a hair brush for all hair types from Wenzhou Huipu Electric Co., Ltd.
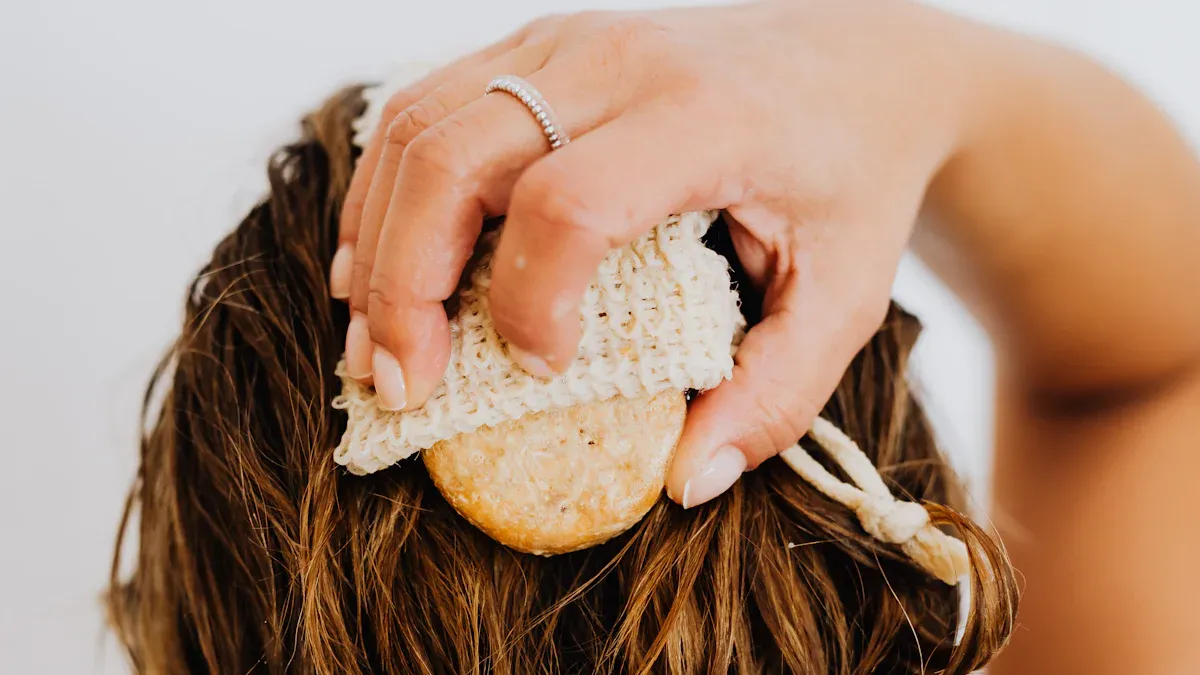
Start by removing hair from your hairbrush. Use your fingers, a rat tail comb, or even a pen to lift and pull out the tangled strands. If you want to clean hair from a hairbrush quickly, do this after every use. This step helps prevent product buildup and keeps your brush working well.
Fill a bowl with warm water and add a few drops of mild shampoo. For extra cleaning power, add a splash of vinegar. Check out the table below to see how vinegar helps:
Component | Effect on Hair Brushes |
|---|---|
Vinegar | Helps dissolve stubborn grime and eliminates bacteria |
Baking Soda | Works with vinegar to dissolve buildup and prevent scalp irritation |
Place your plastic or metal hair brush in the soapy water for about 3 minutes. This helps loosen dirt and product buildup. If your brush has a wooden handle, avoid soaking it—just dip the bristles.
Take an old toothbrush and gently scrub between the bristles. This tool works great for reaching spots your fingers can’t. For natural bristles, use a disinfectant spray instead of soaking.
Pay special attention to any sticky spots or residue. Scrubbing helps deep-clean a hairbrush and removes leftover styling products.
Hold your hair brush under running water to rinse away soap and loosened debris. Make sure all the shampoo and vinegar are gone.
Lay your brush bristle-side down on a towel. Let it air dry completely before using it again. This keeps your clean hairbrush fresh and ready for your next styling session.
Regular cleaning helps prevent bacteria and fungi from growing on your brush. It also keeps your scalp healthy and your hair looking its best.
If you use a premium hair brush for healthy hair, like those from Wenzhou Huipu Electric Co, Ltd., these steps will help your brush last longer and perform better. Now you know how to clean hairbrushes and keep your hairbrush in top shape!
How often you should clean a hairbrush depends on how often it is used, how much hair it collects, and whether styling products are used. A brush used on clean, dry hair may only need light weekly cleaning, while a brush exposed to hair spray, oil, mousse, leave-in conditioner, or shared-use environments needs more frequent cleaning.
As a simple rule, remove loose hair after every few uses and deep clean the brush when you see grey lint, sticky buildup, oil residue, or dust around the base of the bristles.
For normal daily home use, remove loose hair from the brush several times a week. A deeper cleaning every two to four weeks is usually enough for many users, especially if the brush is only used on clean hair without heavy styling products.
If you notice grey lint, dust, or small clumps around the bristles, clean the brush sooner. These buildups are often a mix of hair, fabric lint, scalp oil, skin flakes, and product residue. Once they stick to the bristle base, they become harder to remove with fingers alone.
Recommended routine:
- Remove loose hair regularly.
- Wash the brush every two to four weeks.
- Dry the brush fully before putting it back into a drawer or bag.
- Replace the brush if the bristles are bent, loose, or uncomfortable on the scalp.
Semantic keywords covered: daily hair brush cleaning, how often to clean a hair brush, grey lint in a hair brush.
If you use hair spray, styling cream, hair oil, dry shampoo, gel, mousse, or leave-in conditioner, clean your hair brush more often. Styling products can act like glue, causing dust, lint, loose hair, and scalp residue to stick around the base of the bristles.
For heavy styling product users, a weekly deep clean is often more practical. Use mild shampoo or liquid soap, then scrub the bristle base with an old toothbrush. Rinse thoroughly to avoid leaving soap residue behind.
Pay extra attention to:
- Sticky buildup near the bristle base.
- White or grey residue on the cushion.
- Oily feeling on the bristles.
- Product smell that remains after brushing.
- Hair that becomes greasy faster after using the brush.
If product buildup keeps returning quickly, consider rotating between two brushes or cleaning the brush immediately after heavy styling days.
Semantic keywords covered: clean hair brush with product buildup, remove oil from hair brush, clean hair brush after hairspray.
For salons, hotels, beauty rooms, and shared-use environments, hairbrush cleaning should be more frequent and more controlled. Brushes used by multiple people can collect hair, oil, skin flakes, styling residue, and visible debris much faster than home-use brushes.
In these environments, loose hair should be removed after each use. Brushes should be cleaned and dried regularly based on internal hygiene rules and usage frequency. If a brush is used for retail demonstration, hotel amenities, or salon service, it should look clean, smell neutral, and feel comfortable on the scalp.
For business buyers, this is also a product selection issue. Brushes with easy-to-clean bristles, durable cushion structure, water-resistant materials, and clear care instructions can reduce maintenance work and after-sales complaints.
Recommended routine for shared-use environments:
- Remove visible hair after each use.
- Clean product residue and lint daily or as needed.
- Dry brushes completely before storage.
- Replace brushes with damaged bristles, cracked cushions, or persistent odor.
- Provide simple care instructions for staff or end users.
Semantic keywords covered: salon hair brush cleaning, hotel hair brush hygiene, shared hair brush cleaning, private label hair brush care instructions.
You do not always need to follow a strict calendar. The brush itself will show when it needs cleaning. If you see buildup around the base of the bristles, feel sticky residue, or notice an unpleasant smell, it is time to clean the brush.
Common signs include:
- Loose hair tangled between the bristles.
- Grey lint or dust balls near the bristle base.
- Sticky gunk from oil and styling products.
- White residue from dry shampoo or hair spray.
- Oily or greasy feeling on the brush.
- Odor even after removing loose hair.
- Hair looks dull or greasy after brushing.
- Debris remains after a quick rinse.
If these signs remain after cleaning, the brush may need to be replaced. A damaged brush with bent bristles, a cracked cushion, or a loose base can pull hair unevenly and reduce the user experience.
You might wonder, "How do I know when it’s time to replace my hairbrush?" Here are some clear signs:
Bristles look bent, broken, or start falling out.
The cushion or base of the brush cracks or feels loose.
You notice a strong odor, even after cleaning.
The brush feels rough or uncomfortable on your scalp.
You see dead skin cells, lint, or product buildup that won’t come off, no matter how much you clean.
If you spot any of these issues, it’s time for a new brush. Experts suggest replacing your brush every 6 to 12 months, depending on your hair type and how often you use it. For fine or thin hair, you may need to replace your brush more often. If you have thick or curly hair, your brush might last a bit longer.
Hair Type | Replacement Frequency |
|---|---|
Fine/Thin Hair | Every 6 months |
Thick/Curly Hair | Up to 12 months |
Want your premium hair brush for healthy hair to last longer? Try these simple tips:
Clean your brush regularly to remove lint and buildup. This helps prevent dead skin cells from collecting on the bristles.
Always let your brush dry completely before putting it away. Damp brushes can grow bacteria and trap dead skin cells.
Store your brush in a cool, dry place. Avoid stacking heavy items on top, which can bend the bristles.
For natural bristle brushes, reshape them after washing and let them air dry flat.
Use the original packaging for storage if possible. This keeps the bristles safe and helps your brush keep its shape.
Taking care of your brush not only keeps your hair looking great, but also helps the environment. When you extend the life of your brush, you reduce waste and help protect nature.
Regular cleaning and smart storage will keep your hair brush for all hair types in top condition. If you ever struggle to remove lint and buildup or notice your brush isn’t working like it used to, it’s probably time for a replacement.
You can keep your hair and scalp healthy by cleaning your hair brush regularly. Here’s a quick recap of the steps:
Remove hair from the brush.
Soak in warm, soapy water.
Scrub the bristles.
Rinse well.
Air dry completely.
When you follow these steps, you remove dirt, oil, and product buildup. You also prevent bacteria and fungi from spreading. Clean brushes help your hair look shiny and feel soft.
Based on common after-sales issues in personal care tool use, brushes with bent bristles, cracked cushions, or persistent odor should be replaced rather than repeatedly cleaned!
If you want a premium hair brush for healthy hair, choose Wenzhou Huipu Electric Co.. Ltd. Your hair will thank you!
Remove loose hair first. Then dip the bristles in warm soapy water, scrub the bristle base with an old toothbrush, rinse or wipe clean, and dry the brush bristle-side down. Do not fully soak wooden, cushioned, natural-bristle, or electric brushes.
Grey lint is usually a mix of dust, fabric fibers, scalp oil, dead skin flakes, dandruff, and styling product residue. It often collects around the base of the bristles because oil and product buildup make it sticky.
For some plastic brushes, a small amount of vinegar or baking soda may help loosen residue. However, avoid strong mixtures on wooden, natural-bristle, cushioned, coated, or electric brushes unless the product instructions allow it. Mild shampoo or liquid soap is safer for regular cleaning.
Cleaning combs and hairbrushes removes dirt, oil, and product buildup. Regular cleaning removes oil, lint, dead skin flakes, and styling residue that can transfer back to the hair and scalp. A clean brush also works more smoothly and is easier to inspect for damaged bristles.
Unplug it first and let it cool completely. Remove loose hair from the brush head, wipe the surface with a dry or slightly damp cloth, and clean removable brush heads only if the user manual allows it. Keep water away from the handle, cord, plug, air inlet, motor area, and heating parts.


